OS Developement Details
MY OS
It is a 64 bit operating system kernel capable of printing basic text on to the screen. All the source code for this os is available on my github page. This project was completed with the help of the tutorials by CodePulse on youtube at the following links: Tutorial 1 and Tutorial 2. I used Visual Studio Code to create and edit all the files, but any text editor can be used.
Languages:
- Assembly Language
- C
Software Used:
- Docker
- Qemu
- Visual Studio Code (Text Editor)
Developement
Step 1: Docker
We start by building a docker image for all the extra softwares and files that we will need to build our os. To do this, we create a folder called buildenv, and in it create docker file named DockerFile with the following code:
FROM randomdude/gcc-cross-x86_64-elf
RUN apt-get update
RUN apt-get upgrade -y
RUN apt-get install -y nasm
RUN apt-get install -y xorriso
RUN apt-get install -y grub-pc-bin
RUN apt-get install -y grub-common
VOLUME /root/env
WORKDIR /root/env
Our image is based on the pre-made image from randomdude/gcc-cross-x86_64-elf which contains all the compilation tools that we need.
To build this image, we will run the following line of code in our terminal:
docker build buildenv -t myos-buildenv
Once we have built our image, we will open a container for it using one of the following commands based on what system you are using:
- Linux or MacOS:
docker run --rm -it -v "$pwd":/root/env myos-buildenv - Windows (CMD):
docker run --rm -it -v "%cd%":/root/env myos-buildenv - Windows (PowerShell):
docker run --rm -it -v "${pwd}:/root/env" myos-buildenv
In my case, I ran the second line of code in my command line terminal to open an instance of the docker image we created earlier.
Step 2: Coding our Operating System
Once we’ve done step 1, we are inside a virtual linux machine with access to all the tools we need for this os. Now we begin writing the code for our actual operating system. We start off by writing the x86 assembly code which is the entry point for our operating system, and integrate it with multiboot2, which is supported by most bootloaders.
We create a header.asm file with the following code:
section .multiboot_header
header_start:
; magic number
dd 0xe85250d6 ; multiboot2
; architecture
dd 0 ; protected mode i386
; header length
dd header_end - header_start
; checksum
dd 0x100000000 - (0xe85250d6 + 0 + (header_end - header_start))
; end tag
dw 0
dw 0
dd 8
header_end:
Then we create a main.asm file, to demonstrate printing OK on the screen:
global start
section .text
bits 32 ; we are in 32 bit mode
start:
; to print 'OK'
mov dword [0bx8000], 0x2f4b2f4f
hlt
Step 3: Setting up Linker and grub configurations
Once we have coded our 32 bit operating system, we create the linker file and set up grub configurations. The linker file describes how to link our operating system together. What grub will do is create an iso file out of our operating system kernel binary. An iso file is a common format for holding an operating system. The file codes are shown bellow:
linker.ld file:
ENTRY(start)
SECTIONS
{
. = 1M;
.boot :
{
KEEP(*(.multiboot_header))
}
.text :
{
*(.text)
}
}
grub.cfg file:
set timeout=0
set default=0
menuentry "my os" {
multiboot2 /boot/kernel.bin
boot
}
Step 4: Building our Operating System
Once we’ve done step 2 and 3, we can finally move on to writing the code for building our operating system. We will do this inside of a ‘Make’ file. Make is a handy tool for organizing all your build commands and making sure only modified files get built again to make the building process really fast.
x86_64_asm_source_files := $(shell find src/impl/x86_64 -name *.asm)
x86_64_asm_object_files := $(patsubst src/impl/x86_64/%.asm, build/x86_64/%.o, $(x86_64_asm_source_files))
$(x86_64_asm_object_files): build/x86_64/%.o : src/impl/x86_64/%.asm
mkdir -p $(dir $@) && \
nasm -f elf64 $(patsubst build/x86_64/%.o, src/impl/x86_64/%.asm, $@) -o $@
.PHONY: build-x86_64
build-x86_64: $(x86_64_asm_object_files)
mkdir -p dist/x86_64 && \
x86_64-elf-ld -n -o dist/x86_64/kernel.bin -T targets/x86_64/linker.ld $(x86_64_asm_object_files) && \
cp dist/x86_64/kernel.bin targets/x86_64/iso/boot/kernel.bin && \
grub-mkrescue /usr/lib/grub/i386-pc -o dist/x86_64/kernel.iso targets/x86_64/iso
Once we’ve written our make file, we can finally build our os by simply writing the following command in our terminal:
make build-x86_64
Now we can exit out of our docker emulator by running the exit command in our terminal.
Step 5: QEMU
After step 4, we will have successfully built our operating system and created the iso file. Now we will emulate our operating system our qemu. To do so, we will run the following command in our terminal:
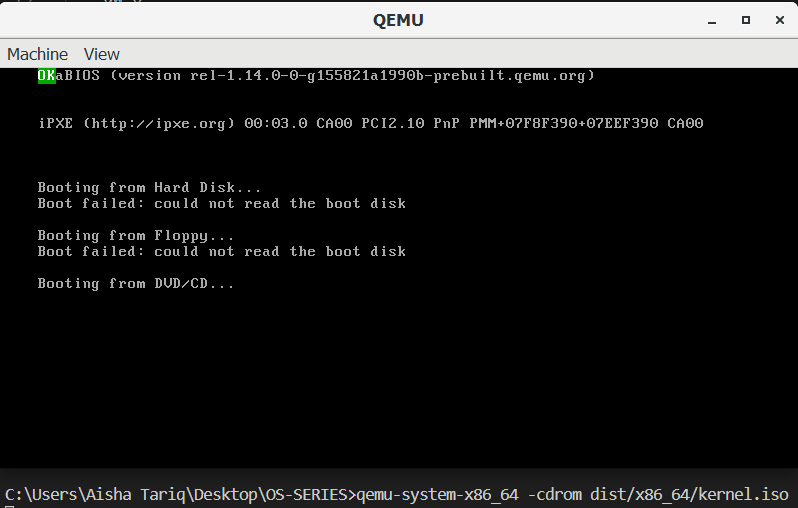
qemu-system-x86_64 -cdrom dist/x86_64/kernel.iso
THE FINAL OUTPUT: Printing ‘OK’
Once we have completed all the steps above, we will have successfully built our 32 bit operating system and emulated it using qemu. We will now be able to see the ‘OK’ (that was written in our main.asm file) on the console screen that appears!!
Converting to 64 bit Operating System
Step 1: Setting up the Stack
Stack is crucial to allow us to link to C code. It is a region of the computer’s memory that stores function call data whcih includes any local function variables and also the memory address to which each function should return control to upon completeion. As functions are recurcisely called, the stack grows, adn as functions are returned, data is popped from the stack. Each segment for a given function call is referred to as a stack frame. It is very simple to setup a stack and once we’ve done that, we will write that c code that handles all the stack manipuaation for us. To setup our stack, we modify our main.asm file to create a stack top and stack bottom label and inside these we reserve 16kbytes of memory. This memory will be reserved when the bootloader loads the kernel.
section .bss
stack_bottom:
resb 4096 * 4
stack_top:
We also move the address of the stacktop into the stack pointer (esp) register in the .text section.
mov esp, stack_top
Step 2: Converting our operating system to 64 bit mode
Before we link to C code, we switch our kernel to 64 bit mode. To do this, we switch our cpu to long mode. We continue to write several subroutines and instructions to successfully do the conversion to 64 bit mode. We also implement paging with 4 page tables, each of size 4 kilobytes. The entirery of the code can be found in the main.asm file on the repository on my github page.
Finally, we create our main64.asm in which we set the bits to 64 bits and load null into all data segment registers.
global long_mode_start
extern kernel_main
section .text
bits 64
long_mode_start:
; load null into all data segment registers
mov ax, 0
mov ss, ax
mov ds, ax
mov es, ax
mov fs, ax
mov gs, ax
call kernel_main
hlt
Our operating system is now ready to be used, and can be built and emulated by running the same commands as we did for the 32 bit version.
Step 3: Writing C code to print on to the screen
Once we’re done with steps 1 and 2, we can begin writing our C code. To do so, we create a main.c file in which we create a function called kernel_main() that we call through our main64.asm file. Whatever C functions we now want to call, we will call them within this kernel_main() function. Currently this os is capable of performing the following custom C print functions (defined in the print.h and print.c files):
Setting the colour of the text and background for printing:
void print_set_color(uint8_t foreground, uint8_t background) {
color = foreground + (background << 4);
}
Available colors are as follows:
enum {
PRINT_COLOR_BLACK = 0,
PRINT_COLOR_BLUE = 1,
PRINT_COLOR_GREEN = 2,
PRINT_COLOR_CYAN = 3,
PRINT_COLOR_RED = 4,
PRINT_COLOR_MAGENTA = 5,
PRINT_COLOR_BROWN = 6,
PRINT_COLOR_LIGHT_GRAY = 7,
PRINT_COLOR_DARK_GRAY = 8,
PRINT_COLOR_LIGHT_BLUE = 9,
PRINT_COLOR_LIGHT_GREEN = 10,
PRINT_COLOR_LIGHT_CYAN = 11,
PRINT_COLOR_LIGHT_RED = 12,
PRINT_COLOR_PINK = 13,
PRINT_COLOR_YELLOW = 14,
PRINT_COLOR_WHITE = 15,
};
Printing a character:
void print_char(char character) {
if (character == '\n') {
print_newline();
return;
}
if (col > NUM_COLS) {
print_newline();
}
buffer[col + NUM_COLS * row] = (struct Char) {
character: (uint8_t) character,
color: color,
};
col++;
}
Number of columns has been set to 80 and number of rows has been set to 25.
Printing a new line:
void print_newline() {
col = 0;
if (row < NUM_ROWS - 1) {
row++;
return;
}
for (size_t row = 1; row < NUM_ROWS; row++) {
for (size_t col = 0; col < NUM_COLS; col++) {
struct Char character = buffer[col + NUM_COLS * row];
buffer[col + NUM_COLS * (row - 1)] = character;
}
}
clear_row(NUM_COLS - 1);
}
Printing a string of characters:
void print_str(char* str) {
for (size_t i = 0; 1; i++) {
char character = (uint8_t) str[i];
if (character == '\0') {
return;
}
print_char(character);
}
}
Clearing a row of characters:
void clear_row(size_t row) {
struct Char empty = (struct Char) {
character: ' ',
color: color,
};
for (size_t col = 0; col < NUM_COLS; col++) {
buffer[col + NUM_COLS * row] = empty;
}
}
Clearing all rows:
void print_clear() {
for (size_t i = 0; i < NUM_ROWS; i++) {
clear_row(i);
}
}
THE FINAL OUTPUT
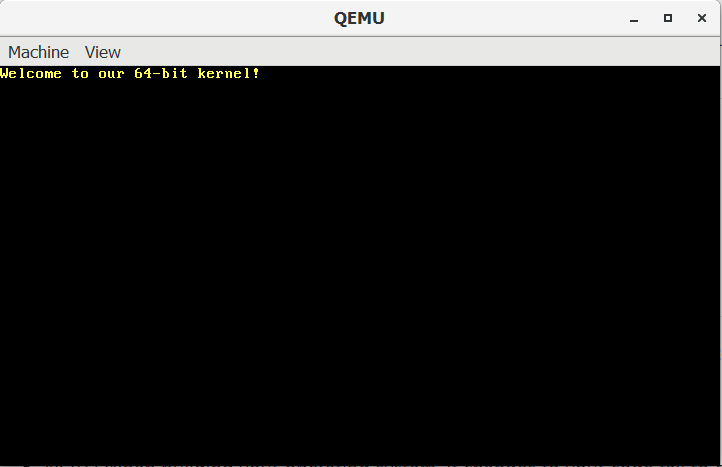
Printing Welcome Text
To print some basic welcome text on to the screen, we use the above functions in our main.c file as follows:
#include "print.h"
void kernel_main() {
print_clear();
print_set_color(PRINT_COLOR_YELLOW, PRINT_COLOR_BLACK);
print_str("Welcome to our 64-bit kernel!");
}
Output:
Printing SEECS
Lastly, the long awaited, to print SEECS onto our screen using different character combinations, we write the following function calls in our main.c file:
#include "print.h"
void kernel_main() {
print_clear();
print_set_color(PRINT_COLOR_YELLOW, PRINT_COLOR_BLACK);
print_str("Welcome to our 64-bit kernel!");
print_newline();
print_str("-----------------------------------------------");
print_newline();
print_str("-----------------------------------------------");
print_newline();
print_str("-----------------------------------------------");
print_newline();
print_str("-----------------------------------------------");
print_newline();
print_str("-------*****--*****--*****--*****--*****-------");
print_newline();
print_str("-------*------*------*------*------*-----------");
print_newline();
print_str("-------*------*------*------*------*-----------");
print_newline();
print_str("-------*****--*****--*****--*------*****-------");
print_newline();
print_str("-----------*--*------*------*----------*-------");
print_newline();
print_str("-----------*--*------*------*----------*-------");
print_newline();
print_str("-------*****--*****--*****--*****--*****-------");
print_newline();
print_str("-----------------------------------------------");
print_newline();
print_str("-----------------------------------------------");
print_newline();
print_str("-----------------------------------------------");
print_newline();
print_str("-----------------------------------------------");
print_newline();
}
Output:

Source Code
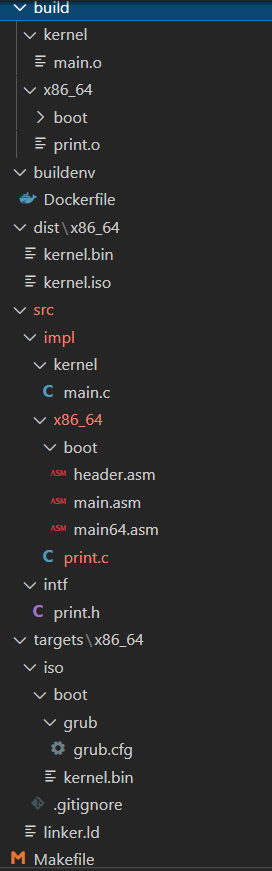
You can find all the source code at https://github.com/AishaTariq/CAO-OS. And in case you’re interested, all the files that we’ve created are organized into folders as follows:
 Thankyou for reading my post! I hope you enjoyed it and find it helpful in creating your own OS. Goodbye!